How to repair your RCA outputs and cracked board - Tutorial

Moderator: TGN

vingthorthehurler
Member
Posts: 729
Joined: Fri Feb 12, 2010 8:18 pm
Location: Elizabeth, New Jersey
Contact:

How to repair your RCA outputs and cracked board - Tutorial

Post by vingthorthehurler »

Hi, my outputs were failing and based on how some people fixed theirs on the 303 threat I decided to open mine and take a look and see how it looks inside this beautiful machine... I bought this 505 for $65 with a 128MB SM card included, guy said some buttons were not working properly, the only button that wasn't working was the F2... so I said I think I can solve this cleaning the contacts!, to fix the outputs I knew what to do, anyways... I do not have any previous experience soldering but I think it worth the try, I copped the soldering machine with all the accessories for less than $12 on Ebay so check for it if you are having this same issue, honestly was pretty easy, anyways I was very careful cleaning the contacts previously the soldering process, something that you should do too... nobody wants to fucked up the sample, right?

Ok, this is how the SP-505 looks inside, it consist basically on 2 main boards, the one in the bottom where are located the inputs/outputs ports and I guess all the voltage controls and probably the processor...
You would need to remover this card from the bottom cover if you want to see the contacts on the board, be careful removing the screws...

Image

Image

This is the top board, where are the pad contacts, buttons, knobs and the display (previously I opened the sampler I though probably I would be able to replace the led's so I could have a customized 505, but this is not possible with this sampler, led's are so fucking tiny! you can't even see them on pics but are located on the middle where goes the pads contacts)

Image

This is how it looks behind the top cover, the small board in here is to control the volumen and rec level:

Image

And those are the beautiful pads!

Image

This is the back of the top board, it looks pretty normal...:

Image

but when I took a closer pic I was able to see the problem!

Image

as you can see the board it's cracked, probably because the previous owner hit the CRTL 3 knob and the knob push the board until it cracked up... but the CTRL 3 knob was working good, anyways I found the contacts were damaged so since I was fixing some other points I decided to fix those contacts also to avoid future problems...

How I fixed the board? the crack was interrupting the electric flow from one of the F2 contacts, so every time that I was pressing the F2 key, nothing happens... I needed to think a way to continue this circuit so I scratched the board with the tip of a knife and I took out the green "paint" that covers the circuit board, but I do this only in the necessary place, do this bigger could mix your contacts and then you are going to burn your sampler!
So board looked like this:

Image

You can see in here how I scratched out the green paint and how the bronze contacts are visible... so theres were I applied a small amount of soldering and voila! problem solved!

Image

On this last pic you can see how I solder the contacts and how it looks now...

Now, let's talk about the RCA contacts...

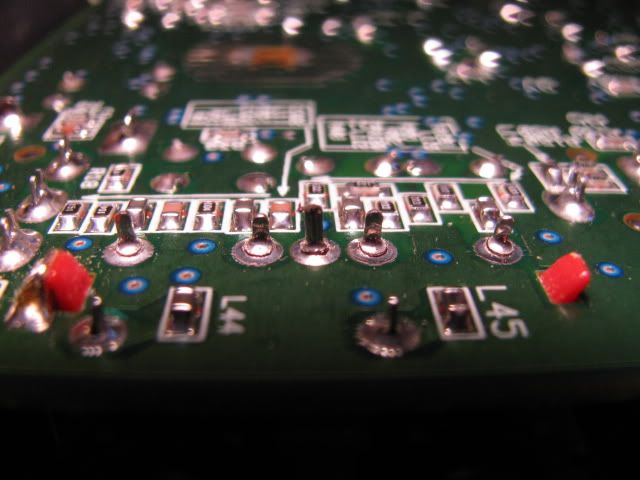
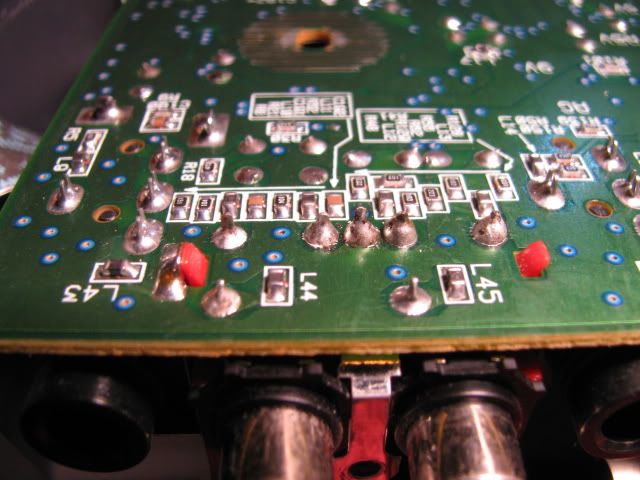
You can see on this pics on the bottom of the L45 and L44 2 contacts that doesn't looks perfectly soldered, those are the contacts that you need to clean and then solder with new iron... how to clean the contacts? the package that I bought came with a de-soldering braid wick, pretty easy! then apply a new solder resin core and you are done! I was afraid to messed up my sampler but I do everything with care trying always to apply the rosin only where you should... you need to be very careful with this and if you do not have previous experience like I do you should be extremely careful! lol...

look at this pics:

Image

Image

you can see like a "ring" on the contacts so this is the space that you should fill, but the best way is clean the contact and apply a new resin so this is going to warranty a long time of use...

This is how the contacts looks after the soldering process...

Image

Image

board its a little white out because every time you apply heat to the resin with the soldering iron it produce a little smoke, so be careful do not place your face too close!

Well, I hope this help somebody who is having the same or similar problems like me!... I need to say... my SP is working and sounding perfectly now!


Peace and Happy New Year!
User avatar
Ill Green
Member
Posts: 1695
Joined: Mon Apr 27, 2009 7:05 pm
Location: LAWLESS MONSTER ZONE
Contact:

Re: How to repair your RCA outputs and cracked board - Tutorial

Post by Ill Green »

Whoa :o Never saw the inside of the 505 before.

Thanks for the info Lo!
User avatar
ellaguru
Member
Posts: 7753
Joined: Sun Jan 04, 2009 9:43 pm
Location: France-Italy

Re: How to repair your RCA outputs and cracked board - Tutorial

Post by ellaguru »

great tutorial
fortunately i never had problems with my 505
i tried to do the same withe the 606 (fx buttons dont work well), but the inside is really difficult to open: there are too many "levels" (stages) to open, so i think i have to call a technician
User avatar
E.Simon
Member
Posts: 467
Joined: Tue Apr 28, 2009 6:51 pm
Location: Nederland

Re: How to repair your RCA outputs and cracked board - Tutorial

Post by E.Simon »

Good post
PEANUTBUTTAH
User avatar
fauna
505 Award Winner '09
Posts: 1692
Joined: Sun Aug 05, 2007 8:26 pm
Location: montreal

Re: How to repair your RCA outputs and cracked board - Tutorial

Post by fauna »

epic! this repair is pro'lly beyond my skill, but uh...i know who to call!

the photos are great.
D/L Hybrids & 5ive Packs, all SP-202, 404, and 505 beat tape:
http://faunaflage.bandcamp.com/album/hybrids-5ive-packs

post post post rock:
http://www.myspace.com/faunaflage | http://soundcloud.com/faunaflage
vingthorthehurler
Member
Posts: 729
Joined: Fri Feb 12, 2010 8:18 pm
Location: Elizabeth, New Jersey
Contact:

Re: How to repair your RCA outputs and cracked board - Tutorial

Post by vingthorthehurler »

Thanks!!, I learned a lot from this forum, I just feel that I'm giving my little contribution... :D


Peace and thanks for the feedback!
BOSSman
New member
Posts: 1
Joined: Sun Feb 06, 2011 12:19 am

Re: How to repair your RCA outputs and cracked board - Tutorial

Post by BOSSman »

locotesmjr wrote:Hi, my outputs were failing and based on how some people fixed theirs on the 303 threat I decided to open mine and take a look and see how it looks inside this beautiful machine...


Great success! I too was having trouble with my SP-505 RCA outputs. The volume was dropping intermittently and sometimes there would be no sound at all.(I actually had this exact problem with my old SP-303 several years back!) I google searched "SP-505 RCA repair" and this thread was hit #2.

Seeing the pictures here gave me just enough confidence to crack my SP-505 open and take a look. I haven't done any soldering since working on car stereos in high school and I wasn't sure I'd even know what I was looking at once I got it open. Looking at the pictures in the original post, I couldn't really see the problem with the soldering of the original connections. But once I got mine open and looked at those connection points it was very clear what the problem was.

Here you can clearly see that the solder is cracked completely around the circumference of the 5 points in a row immediately behind the RCA jack:
Image

I used a de-soldering hand bulb and my trusty radio shack butane soldering iron to remove the old solder. Then I re-soldered those five connections. I started at the left and the furthest left solder turned out factory perfect! Beginners luck I guess. The other four look a bit like tin hershey's kisses but I think that's ok:
Image

I put it back together and booted her up and she passed the smoke test. Now my signal is flowing strong and consistent. Much thanks to the thread creator for doing this! I thought I should register here and add my results since I know the RCA outputs on the SP gear frequently deteriorate over time. I wonder why that is by the way because every single other connection on the board looked fine except for these five for the RCA(?).
User avatar
djmellow
Member
Posts: 283
Joined: Wed Feb 13, 2008 6:12 am
Location: northern california

Re: How to repair your RCA outputs and cracked board - Tutorial

Post by djmellow »

just had to do this to my 505. just did a tiny bit of soldering on those points and it totally solved the problem.
sp-505
mr16levels
Member
Posts: 59
Joined: Thu Aug 04, 2011 9:15 pm

Re: How to repair your RCA outputs and cracked board - Tutorial

Post by mr16levels »

Great tutorial!

Just picked up an Sp 505 haven't popped her open yet
vingthorthehurler
Member
Posts: 729
Joined: Fri Feb 12, 2010 8:18 pm
Location: Elizabeth, New Jersey
Contact:

Re: How to repair your RCA outputs and cracked board - Tutorial

Post by vingthorthehurler »

mr16levels wrote:Great tutorial!

Just picked up an Sp 505 haven't popped her open yet


Thank you, check my other tutorial about how to flip your display... I hope you are enjoying your 505.
Peace.
mr16levels
Member
Posts: 59
Joined: Thu Aug 04, 2011 9:15 pm

Re: How to repair your RCA outputs and cracked board - Tutorial

Post by mr16levels »

I'll be sure to check that out. Right now I've just been using the 505 for its filters. Tried to sequence something on it last night and had a bad experience.


Everytime I added a sound to the sequencer it just got dirty it almost sound like digital distortion.

For an example.

Laid the highhat down= no problem
auditioning the snare before laying it down = fine and clear

soon as i hit record and lay the snare down or any other sound it gave this weird distorted sound... just very odd

forcing me back to my 303
User avatar
djmellow
Member
Posts: 283
Joined: Wed Feb 13, 2008 6:12 am
Location: northern california

Re: How to repair your RCA outputs and cracked board - Tutorial

Post by djmellow »

my guess is that the sample is still a "phrase" sample, go to "wave edit", then scroll down to where it says "sample type", move it from "phrase" to "single", that way when your sample plays in a sequence the sequencer isn't trying to match the bpm of the sample to the sequence's bpm. hope this helps. i pretty much never use the sample as a phrase, i always just change them to single. just a thought. :D
sp-505
mr16levels
Member
Posts: 59
Joined: Thu Aug 04, 2011 9:15 pm

Re: How to repair your RCA outputs and cracked board - Tutorial

Post by mr16levels »

Oh! ok I will check for that thanks
dinner-for-two
Member
Posts: 145
Joined: Sun Feb 14, 2010 1:34 am

Re: How to repair your RCA outputs and cracked board - Tutorial

Post by dinner-for-two »

yo thanks loc and boss for posting the pics on how to do this. we just fixed my 505
rolandrolandroland
New member
Posts: 2
Joined: Wed Oct 12, 2011 5:35 pm

Re: How to repair your RCA outputs and cracked board - Tutorial

Post by rolandrolandroland »

Hi all. Thanks to all who contributed the great content to this thread. I had an additional, hopefully-not-dumb question.

I just picked up a used SP-505 from Craiglist. I tested it only with headphones before I bought it (both R and L worked fine), but when I took it home, I discovered that the right RCA out doesn't work but the left works just fine. I reset the unit to factory settings to ensure it wasn't some sort of weird balance/pan setting, but the problem persists.

I tried different RCA cables, did "the jack jiggle", and everything else but there's absolutely no hint of any signal from the right out. Is it plausible for one channel to be completely busted with the other unaffected? (Sorry if a naive question; the majority of my soldering experience has been limited to guitar electronics) Any help would be greatly appreciated.

Thanks!
Post Reply